Creating Our AdonisJS Project
First, we’ll get a new AdonisJS project set up.
npm init adonis-ts-app@latest adonis-inertia-ssr # CUSTOMIZE PROJECT # ❯ Select the project structure · web # ❯ Enter the project name · adonis-inertia-ssr # ❯ Setup eslint? (y/N) · true/false # ❯ Configure webpack encore for compiling frontend assets? (y/N) · trueCopied!
We’ll select web for our project structure so that it auto-includes the session and view packages. We’ll also include Webpack encore for our assets. Everything else is up to you.
The Adonis Inertia Provider
Next, we’ll need to install and configure the Adonis Inertia provider.
npm i @eidellev/inertia-adonisjs # ❯ Enter the `.edge` view file you would like to use as your root template · app # ❯ Would you like to use SSR? (y/N) · true # ❯ Which client-side adapter would you like to set up? · Vue 3 # [ wait ] Installing dependencies: @inertiajs/vue3, vue, @vue/server-renderer, webpa # ck-node-externals . # CREATE: config/inertia.ts # CREATE: resources/views/app.edge # CREATE: start/inertia.ts # CREATE: webpack.ssr.config.js # UPDATE: .adonisrc.json { commands += "@eidellev/inertia-adonisjs/build/commands" } # UPDATE: .adonisrc.json { providers += "@eidellev/inertia-adonisjs" } # UPDATE: .adonisrc.json { preloads += "./start/inertia" } # CREATE: ace-manifest.json fileCopied!
We’ll be using app as our Edge root file, make sure to set SSR to true, and we’ll be using Vue 3 here today.
This will stub some files into our application to get things going. Most notable is the addition of a webpack.ssr.config.js. This, as named, is our SSR configuration for Webpack.
Upgrading from an older InertiaJS version? Be sure to run through their upgrade guide to familiarize yourself with the changes.
Setting Up Our Vue Apps
Yes, apps… as in two apps. The key to getting SSR working is to have a separate entry point for our application. The SSR version will use Vue’s createSSRApp instead of the traditional createApp that our client side will use.
Client Side App Entry
import '../css/app.css' import { createApp, h } from 'vue' import { createInertiaApp } from '@inertiajs/vue3' createInertiaApp({ resolve: name => { const page = require(`./Pages/${name}`) return page }, setup({ el, App, props, plugin }) { createApp({ render: () => h(App, props) }) .use(plugin) .mount(el) }, })Copied!
- resources
- js
- app.js
Here we create our Vue app inside the Inertia setup. This allows Inertia to mutate our app as needed. Our Vue pages will reside within a Pages directory, and the resolve method is in charge of grabbing the correct file for the designated page name.
Server Side App Entry
Next, let’s create a new file at the same location called ssr.js. This will look fairly similar to our app.js, with some server-side twists 😱.
import { createSSRApp, h } from 'vue'; import { renderToString } from '@vue/server-renderer'; import { createInertiaApp } from '@inertiajs/vue3'; export default function render(page) { return createInertiaApp({ page, render: renderToString, resolve: name => { const page = require(`./Pages/${name}`) return page }, setup({ App, props, plugin }) { return createSSRApp({ render: () => h(App, props), }).use(plugin); }, }); }Copied!
- resources
- js
- ssr.js
First, the createInertiaApp is wrapped in a render method that’s provided on the page and the Inertia app is returned. Then, we’ll designate Vue’s server renderer as Inertia’s render method. Lastly, the setup method for Inertia is altered to create a Vue SSR app.
Configuring Webpack
Next, we’ll need to enable Vue and make a few tweaks to our SSR Webpack config.
Client-Side Webpack Config
First, within our webpack.config.js (this is our client-side config), scroll down to around line 184 and uncomment the Vue loader configuration.
Encore.enableVueLoader(() => {}, { version: 3, runtimeCompilerBuild: false, useJsx: false })Copied!
Server-Side Webpack Config
Next, within our webpack.srr.config.js (our ssr config), let’s uncomment the Vue loader configuration here as well. It should be around line 145.
Encore.enableVueLoader(() => {}, { version: 3, runtimeCompilerBuild: false, useJsx: false, })Copied!
Then, scroll down to the bottom of the file, and let’s alter the externals config.
--config.externals = [require('webpack-node-externals')()] config.externals = [require('webpack-node-externals')({ allowlist: ['@inertiajs/core', '@inertiajs/vue3'], })]Copied!
An important note is that Inertia V1 uses ESM. Without SSR, this wouldn’t be much of an issue, however, ESM is coming to AdonisJS in version 6 so, when the Inertia core and Vue 3 packages attempt to import on the server, we run into issues.
This externals config is excluding these two packages from our SSR bundle, allowing us to bypass this issue.
The alternative option is to stick to pre-V1 for Inertia via the legacy documentation, as those versions didn’t use ESM only.
Let’s Make A Page!
Next, let’s make a page to test this out!
<script setup> defineProps(['title']) </script> <template> <div> <h1>Home Page</h1> </div> </template>Copied!
- resources
- js
- Pages
- Index.vue
Define the inertia route, for this, we’ll just alter our welcome route.
Route.get('/', async ({ inertia }) => { return inertia.render('Index', { title: 'Test; }) })Copied!
- start
- routes.ts
Let It Rip!
Lastly, to boot up our dev environment, we’ll have two different commands to run; one for our server-side script and another for the client side.
node ace ssr:watch # get the server-side script going npm run dev # get the server booted & our client-side goingCopied!
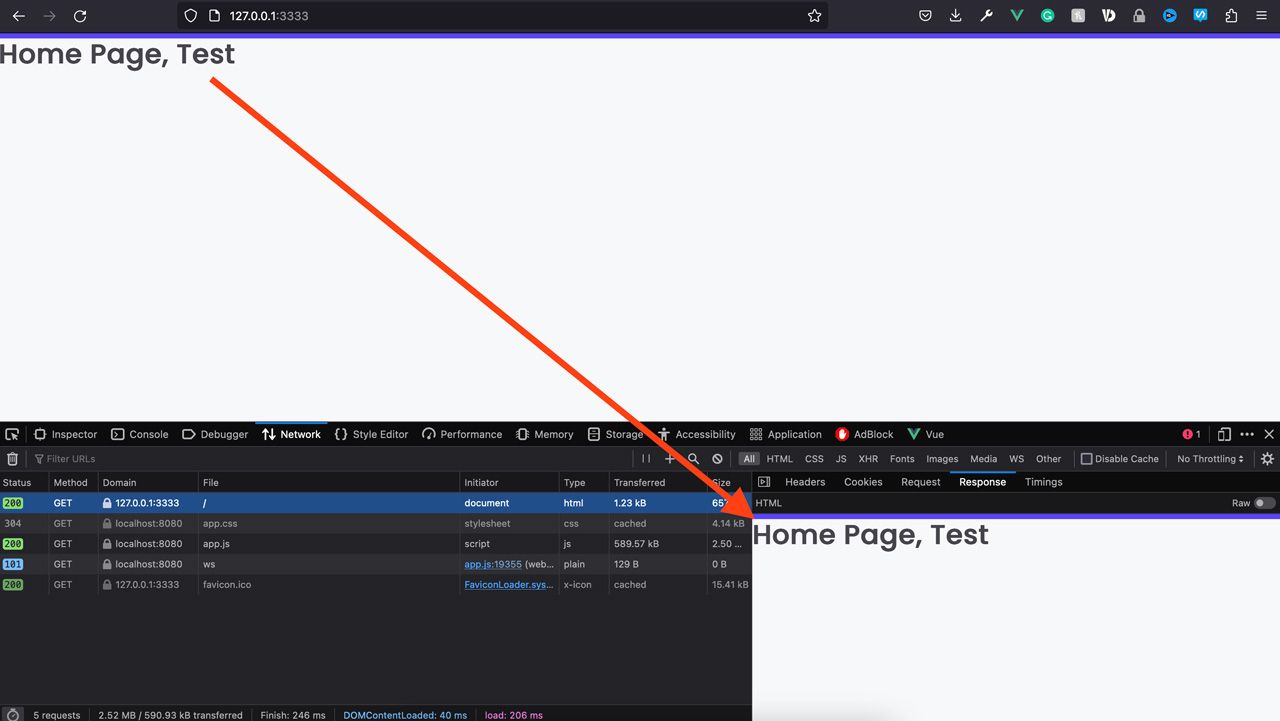
Then, open your server in your browser. Be sure to inspect your document’s response. If SSR is working correctly, you’ll see your <h1>Home Page</h1> markup directly inside the raw response body. If it’s missing, something went wrong and your server-side rendering isn’t working.
Adding A Default Layout
Lastly, let’s add a default layout.
<script setup> import { Link } from '@inertiajs/vue3' </script> <template> <div> <nav> <Link href="/">Home</Link> <Link href="/about">About</Link> </nav> <main> <slot /> </main> </div> </template>Copied!
- resources
- js
- Layouts
- App.vue
So, that’s our simple layout, let’s set it as our app’s default.
import '../css/app.css' import { createApp, h } from 'vue' import { createInertiaApp } from '@inertiajs/vue3' import Layout from './Layouts/App.vue' createInertiaApp({ resolve: name => { const page = require(`./Pages/${name}`) page.default.layout = page.default.layout || Layout return page }, setup({ el, App, props, plugin }) { createApp({ render: () => h(App, props) }) .use(plugin) .mount(el) }, })Copied!
- resources
- js
- app.js
Lastly, and with it comes an important note, we need to duplicate this change over to our server-side app creation. Otherwise, our layout will only be rendered on the client side and not the server side.
import { createSSRApp, h } from 'vue'; import { renderToString } from '@vue/server-renderer' import { createInertiaApp } from '@inertiajs/vue3' import Layout from './Layouts/App.vue' export default function render(page) { return createInertiaApp({ page, render: renderToString, resolve: name => { const page = require(`./Pages/${name}`) page.default.layout = page.default.layout || Layout return page }, setup({ App, props, plugin }) { return createSSRApp({ render: () => h(App, props), }).use(plugin); }, }); }Copied!
- resources
- js
- ssr.js
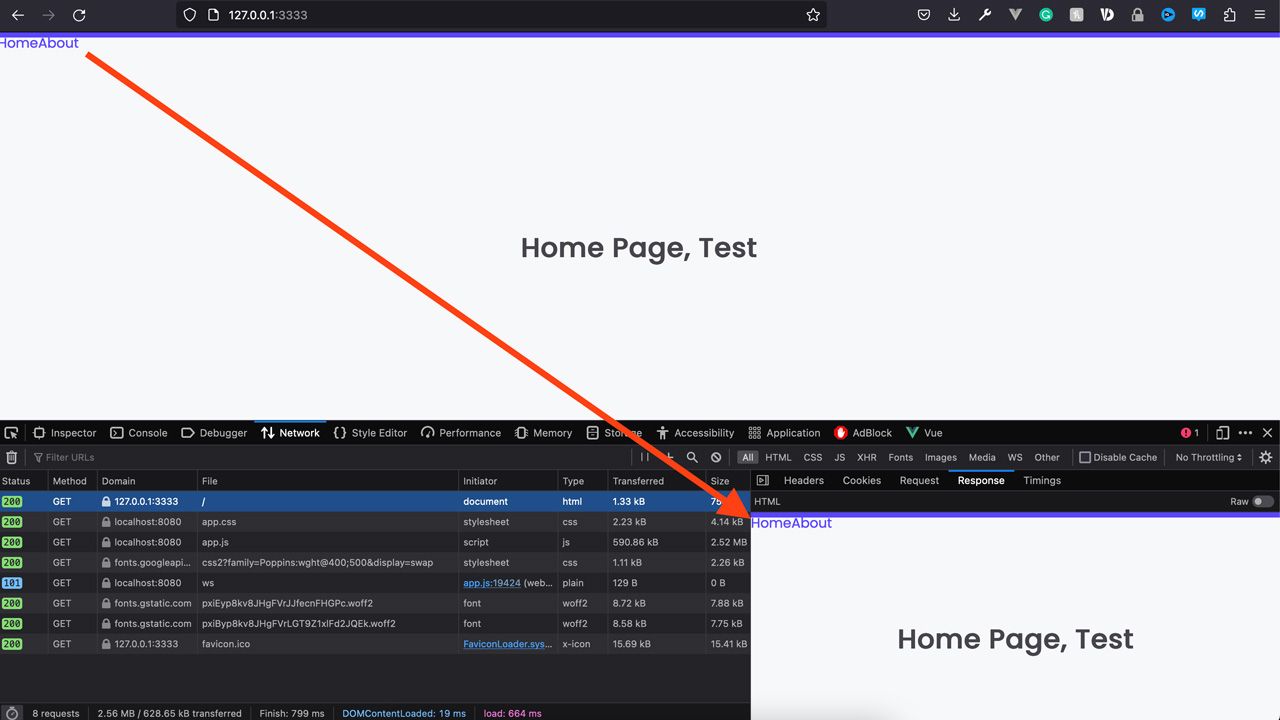
With that, our layout should now be included by default. Better yet, it’s also being rendered on the server, which we can confirm in our document’s network response.

Join The Discussion! (0 Comments)
Please sign in or sign up for free to join in on the dicussion.
Be the first to Comment!